
What is Visual Basic?
Microsoft Visual Basic Tutorial
Visual Basic also known as VB is a programming language from Microsoft. It is part of the Microsoft Visual studio software package. Using Visual Basic you can develop Windows and Web applications. Visual Basic is an Object Oriented Programming with full capabilities and concepts like objects, properties, classes, events, methods, inheritance and encapsulation. In addition to Visual Basic, Microsoft Visual Studio includes Visual c# (C sharp), Visual C +, Visual F+ and a few other titles. If you look for our old content on Visual Basic, please visit VB 6.0 page.
History of Visual Basic with timeline
Visual Basic was derived from BASIC , an introductory computer language for non techies. Visual Basic is a third generation OOED (object oriented, even driven) language. Here is the time line on Visual Basic versions:
| Date of Release | Version | Significant Milestones |
| March 1991 | Visual Basic 1.0 | Create Windows applications quickly |
| November 1992 | Visual Basic 2.0 | Support for ODBC and MDI forms |
| October 1996 | Visual Basic 4.0 | Create 32 bit as well as 16-bit Windows application |
| October 1998 | Visual Basic 6.0 | Active X controls and Database Access |
| February 2002 | Visual Basic .Net (VB 7.0) | Major Shift to NET framework and also focused on XML based application |
| October 2005 | Visual Basic .Net 2005 (VB 8.0) | Support for .NET 2.0 and partial classes |
| November 2007 | Visual Basic .Net 2008 (VB 9.0) | Support for .NET 3.5 and LINQ |
| November 2010 | Visual Basic .Net 2010 | Added features like Inline functions |
| 1996 | VBScript (Active Scripting) | Used for Web and Administration applications |
| 1993 | VBA (Visual Basic for Applications) | Used for programming in MS Office applications |
How do I learn Visual Basic?
In our opinion, the best way to learn Visual Basic is with Hands-on examples. In today’s tutorial on Visual Basic, we will use Microsoft Visual Basic 2010 Express . .
We will guide you through the basic steps of how to create a simple login Visual Basic application. In order to get started, after you download and install the VB software, you can launch the program by following this:
All Programs > Microsoft Visual Studio 2010 Express > Microsoft Visual Basic 2010 Express.
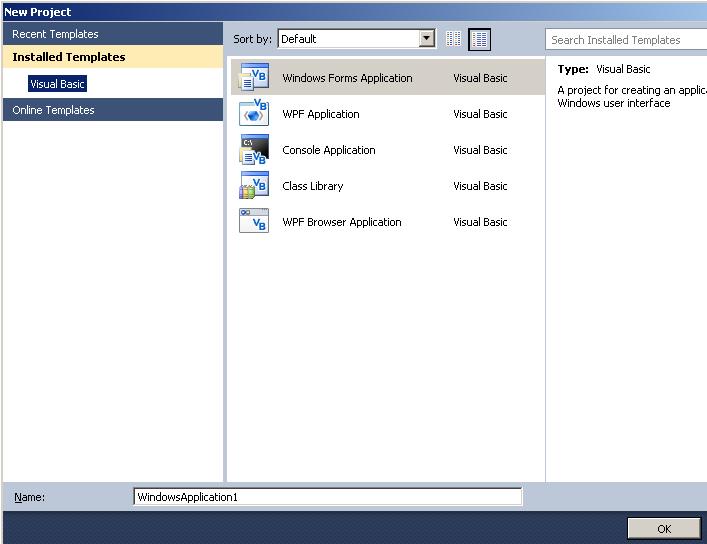
You will get a new window similar to the one shown below. Here you can choose what type of Visual Basic project you will create. We select Windows Form Application, type LoginScreen for the Name and click OK.
Microsoft Visual Basic 2010 interface:
If you do the same thing as above and click OK, you should see the VB GUI (Graphic User Interface). It is also known as Visual Basic IDE (Integrated Development Environment). This is where you have all the necessary tools and commands that will help you build the application.
We have included a screen capture shown below:

Before we get going with our example on Visual Basic 2010, we are going to cover basic VB GUI windows.
File Menu: Highlighted in aquamarine, you can use this to create, debug, add components and save a VB project
Toolbar: Right below the File Menu, you will see icon for commonly used functions like Copy, Paste, Save, Inserting comments, Debugging (green play button) and other debugging options.
Toolbox: This is on the left side of the IDE and enclosed in red color. This is the container of all different object controls and objects like text boxes, labels, command buttons and others available in VB.
Form/Code window: Highlighted in blue and nested in the middle, you can see the VB Form. This is where you can add the controls we mentioned in the Toolbox onto the Form
Solution Explorer: Highlighted in green, here you have all the project information including VB forms, references and other project related items
Properties: Highlighted in purple, this is where you can review properties of form controls. You can also change objects properties anything from size to dimensions to color.
How to create a Visual Basic application?
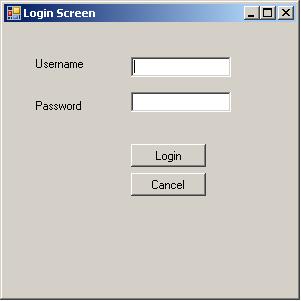
The best way to learn anything is by getting your hands dirty and practicing with it. We are going to do just here with a new Visual Basic application. We will be developing a simple project that can be used as a login screen. We will need a form with textboxes for username and password entry. The program should then check the credentials and give out a message for either approved access or denial.
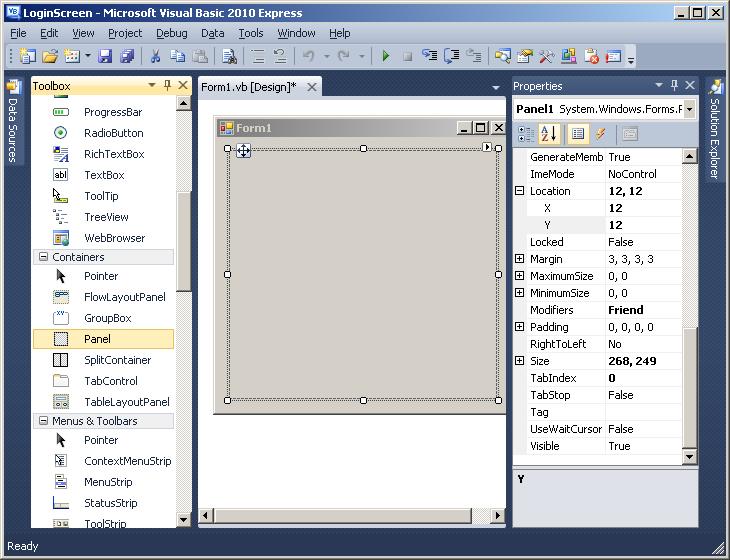
First we are going to add some VB controls. We begin by adding a Panel object to our form Form1. In order to do this, you can drag the Panel (light orange) from Visual Basic Toolbox window and drag it onto the Form in the middle. Notice Location and Size values in the Properties window on the right side.
Here is what it looks like on our monitor screen:
Next we are going to add the following Visual Basic controls:
| VB Control |
Object Name |
| Label | lblUserName |
| Label | lblPassword |
| TextBox | txtUserName |
| TextBox | txtPassword |
| Button Control | cmdLogin |
| Button Control | cmdCancel |
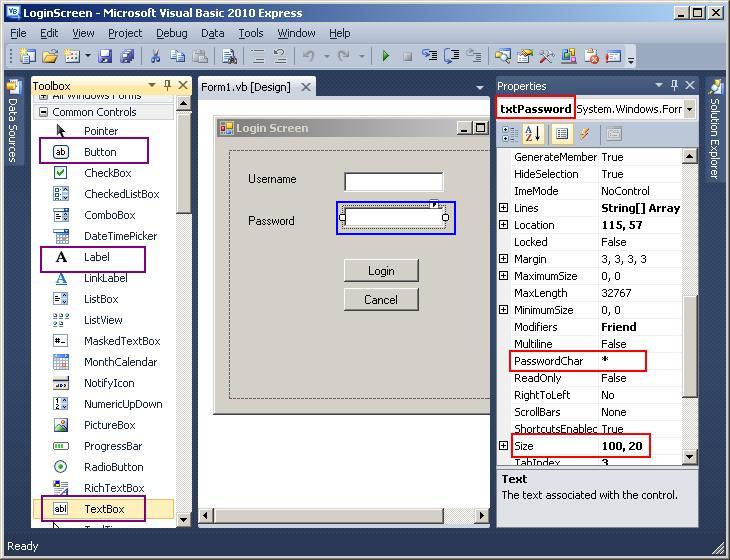
We have highlighted the VB Controls in the Toolbox window below (purple) and actual txtPassword control on form Form1 (blue). When we did that, it shows the property of this text box in properties window (red).
Here is what our screen in Visual Basic looks like:
How will the Login VB application function?
Here is how the program will function:
First the user will enter their username and password information. When they click on the Login button control, the VB program then needs to check the username and password credentials. If a match is found, a welcome message is displayed otherwise we will politely tell them to leave the premises!
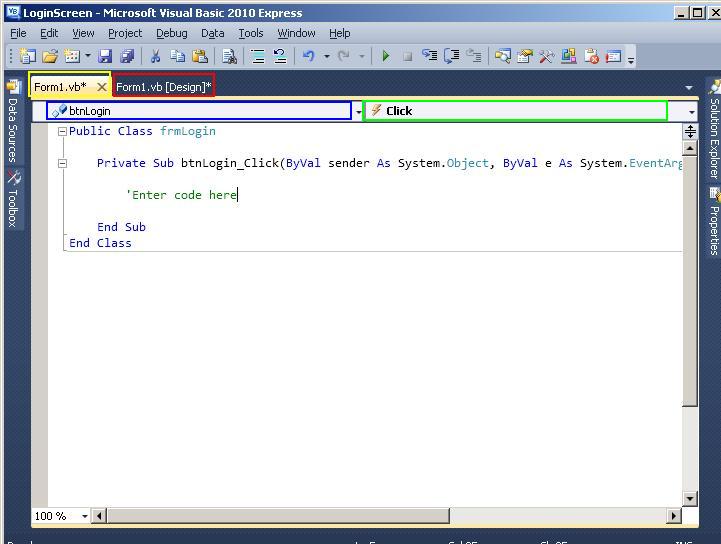
In order to write the code behind a VB control, you simply double click on the control. In this case, the control is the Login command button, so we double click on it. This will launch the Code window also known as Code editor. We have included a screen shot here, notice now we have two tabs:
Form1.vb – VB Code window
Form1.vb [design] – Actual Visual Basic form
Right below these tabs, we have highlighted two important things:
btnLogin – highlighted in blue, this is the VB object we are going to program for
Click – highlighted in green, this is the object event we are going to program for
Ready to enter some VB Code?
Next we are ready to start the VB statements. Go ahead and enter the
following code:
‘Enter code here
‘if then logic to check condition
If txtUserName.Text = “learningcomputer” And txtPassword.Text = “Passw0rd1” Then
‘Access granted’
MsgBox(“Welcome to Visual Basic 2010”)
Else
‘Access denied’
MsgBox(“Please leave the premises”)
Me.Close()
End If
The lines that start with an apostrophe ‘ are comments (highlighted in green). These help the programmer understand the function of the code
that follows the comment. Here is what the Visual Basic program code looks like on our screen:

Before we explain this programming code, let’s cover the basic of conditional logic in VB.
Conditional logic in Visual Basic:
When the program is being executed, the VB code will have to make decisions depending on the input. We do this by using conditional logic in the programming code. There are two ways to check for conditions in Visual Basic. Here are the methods:
1. Select case statement
More information on this can be found on this excellent VB site
2. If-then statement
If-then is the most common method for decision making in Visual Basic. Here’s the basic syntax of if-then statement:
If condition= true then
execute true statements
else
execute false statements
end if
Notice it is common to indent (tab) the statements after the if clause and else clause. So for our example, let’s check out the first condition: Here is what the code looks like:
‘if then logic to check condition
If txtUserName.Text = “learningcomputer” And txtPassword.Text = “Passw0rd1” Then
‘Access granted’
MsgBox(“Welcome to Visual Basic 2010”)
In Plain English, the first line (starting with If txtUserName.Text ..) is looking for value of learningcomputer in the txtUserName.Text (.text
property for text box txtUserName ) and value of Passw0rd1 in the txtPassword.Text (.text property for text box txtPassword) then do this:
‘Access granted’
This line starts with single quote is just a comment to help the vb developer
MsgBox(“Welcome to Visual Basic 2010”)
This line will output a message box with the text, Welcome to Visual Basic 2010
Next we are going to look at the Else block code shown below:
Else
‘Access denied’
MsgBox(“Please leave the premises”)
Me.Close()
Again in plain English, if the first condition is not true, then the code after the Else is executed.
‘Access denied’ – just a comment as in Fyi
MsgBox(“Please leave the premises”)
Gives the user a message box with Access denied info
Me.Close()
Closes the form (Form 1 in this case also known as Me)
Ready to Execute the VB Program?
Now that you understand the basic mechanics of this login form, let us go ahead and run the application. Before we do that, let us save the project. You can do that by either doing File > Save All or by clicking
floppy drives icon on the Toolbar.
When we did that, we got the following dialog box:

We enter LoginScreen in the Name, Location of c:\Temp and click Save. Now we can run the Visual Basic project. You can execute a project by either clicking on the Green play button on the Toolbar window or selecting this from the File Menu.
Debug > Start Debugging (F5)
When we did that on our end, here is what we see on our Putr. You can see data entry form where you can enter username and password information.
Enter the Username and Password:
Let’s go ahead and enter the following information:
Username: learningcomputer
Password: Passw0rd1
Next you can click on the Login button. If you did this right, you should get the following VB dialog box:
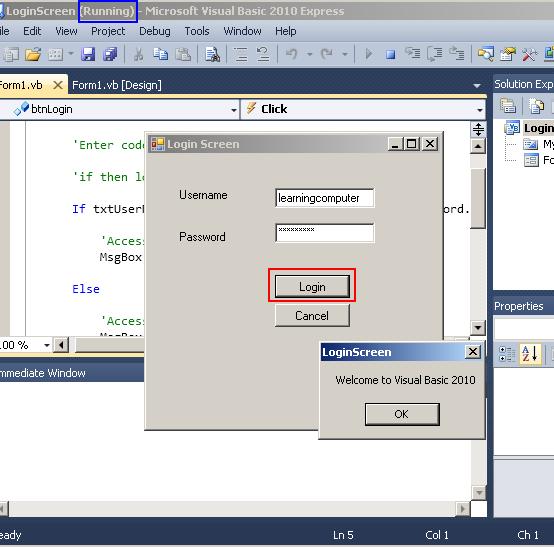
Woohoo! Our program is now working just as designed.
Notice two things:
1. In the Title bar (highlighted in blue), it mentions that the Program is Running
2. When you clicked on Login button control, VB 2010 displayed the Welcome to Visual Basic 2010 message box. In other words you have passed the Login screen.
Subsequently we want to test the else condition. All we need to do is to try another username/password combination. When we did that, we got the Access denied message shown right below.
After that Visual Basic closes the form.

What about the Cancel button?
One minor thing we forgot to mention. When the use clicks on the Cancel button control, we would like to close the application. Here is the code for that, similar to the Else block.
‘Close the form
Me.Close()
This finishes the simple Login Program for VB 2010.
Other important VB concepts:
We would like to highlight a few other important concepts in Visual Basic Language. Here are they:
Declaration of variables:
In Visual Basic, you declare variables to temporarily store values during the execution of a program. Variables have a name and a data type (which determines what kind of data the variable can store). You declare a variable with the Dim statement, supplying a name for the variable.
The syntax for declaring a variable is
Dim variable name [As type]
Where:
Variable name: Name of the variable chosen by the Visual Basic programmer
Type: One of the many VB data types e.g. integer, string, data, variant (default) etc.
Examples of VB variables:
Dim strName As String ‘string data type holds text data
Dim intCust As Integer
‘Assignment of variables
strName = “Kash Money”
intCust = 4323
‘Message Box displaying the variable values
MsgBox(“Customer ID for “ & strName & ” is “ & intCust)
First we declare two variables, one to hold the name and the other to hold customer ID. Next we assign value to these variables. Finally we display the values using a Message box. One new item here is this & symbol which is used to concatenation (combining text together) in VB 2010. You can add this code to a new btn control’s click event like we have already showed you earlier. After that you can execute the program and then click on the btn control.
Here is what we see in our Visual Basic code execution:

We have highlighted the variables in red rectangle for your understanding.
Visual Basic Loops (Repletion logic):
Besides conditional logic, a software program also needs to be able to perform repetitive tasks. It may be that you need to process items in a list or parse through database records one at a time. In a software program, this is typically achieved by some kind of looping. In Visual Basic, you can repeat tasks by using one of these three types on Loops:
1. For – Next statements
2. Do – While statements
3. Do – Until statements
Lets look a little further into these.
For – Next statements:
The For – Next loop repeats a group of statements a specified number of times. This type of loop is handy when you know exactly how many times you need to repeat the action. The syntax is as follows:
For Counter = Start To End [step size]
statements[Exit For]
Next [counter]
Where:
Counter: Variable (usually an integer) used to control the flow of the loop
Start: Initial value of the counter
End: Final value of the counter
Step size: optional; the amount the counter increases by every time the loop is executed, typically 1
Exit For: optional; statement to break out of the loop
Notice [ ] are all optional statements
Example of a For – Next statement:
In order understand the Visual Basic For-Next loop, lets us use a simple example. We will loop five times and simply display the counter value in the Debug window. The Debug window is typically used to trouble shoot issues in Visual Basic programming code.
Here is what the For – Next code looks like:
‘declare the variable
Dim intCount As Integer
‘loop 5 times
For intCount = 1 To 5
‘Write the counter value to the debug window
Debug.WriteLine(“Loop counter is now “ & intCount & vbCrLf)
Next
We start with declaration of intCount as an integer. Next we open the For – Next loop with starting value of intCount=1. We will use Debug.WriteLine to display the counter value in the Debug window. vbCrLf is constant value for carriage return character and line feed character. Basically it force the program to go to a new line. Then we loop through the procedure five times.
When we run this piece of code, here is what it looks like on our end:

Do – Loop statements
Unlike the For – Next loop, the Do – Loop statements repeat a block of statements while a condition is true. You can important Do – Loop by either using Do .. While or Do .. Until loop. Lets look at one of them next.
Do – While statements
With Do – While statement, you can have a Pre-test loop where the loop condition it checked first. Here is syntax for a Pre-test Do .. While statement.
Do While condition
statements[Exit Do]
Loop
For a Post-test loop when the loop condition is check after the code, the syntax is as follows:
Do
statements[Exit Do]
Loop While condition
Where:
Do: Starts the loop
While condition: Repeat the loop While this condition is true
Exit Do: Optional; statement to break out of the loop.
Example of a Do – While statement:
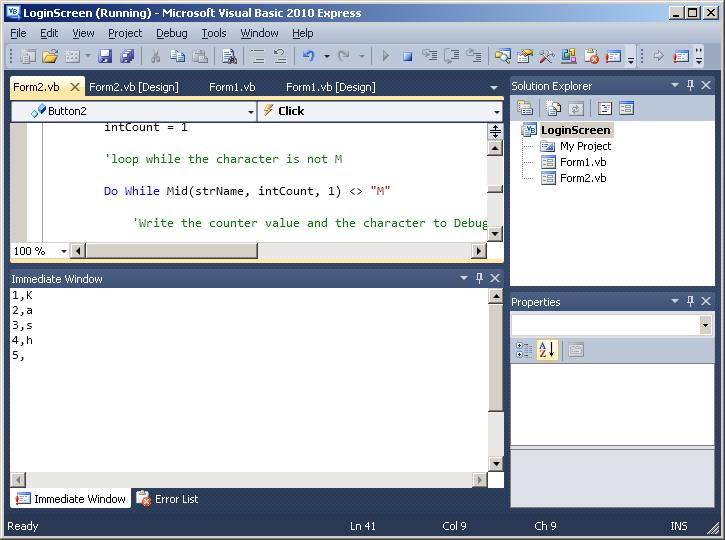
We are going to create a VB program where we are looking for a particular character in an expression. Our expression is “Kash Money” ofcourse. We would like to read one character at a time using the >VB MID function. When we find a “M” we would like to stop execution.
Here is what the code looks like:
‘declare the variables
Dim intCount As Integer
Dim strName As String
strName = “Kash Money”
intCount = 1
‘loop while the character is not M
Do While Mid(strName, intCount, 1) <> “M”
‘Write the counter value and the character to Debug Window
Debug.WriteLine(intCount & “,” & Mid(strName, intCount, 1))
intCount = intCount + 1
Loop
Lets us review the code. We declare two variables, intCount to track counter value and strName to store the expression. Next we assign values to these. We start out the loop with this VB code, Do While. We are also using MID function. You can read more about this on this function page. Basically it will read one character at a time in our expression, “Kash Money”. As we are reading the values, we also print the output to the Debug window. We are displaying, the counter value and the character found by the MID function. Finally we increment the counter by 1. This will continue execution till it finds the character “M” and then will stop.
After we execute this program, here what our screen image displays:
Visual Basic Related Links:
There are quite a few items regarding Visual Basic that we did not cover. However we have compiled a list of resources on VB that will aid you in the learning process. Here it is:
–What is Visual Basic
–Introduction to Visual Basic
–Visual Basic home page
If you would like more information about Visual Basic this is a useful link to look into.
Connect with US!
![]()