|
Using the Mail Merge feature in
Microsoft Word 2007, you can write a customized letter or
flier to all your customers in one shot. Each letter has
the same kind of information, yet the customer content is
unique typically provided by a data source. The data
source could be in many formats including text file, Microsoft
Excel, Microsoft Access, SQL server 2008, Oracle, etc.
Today we will look at the procedure of using mail merge in
Microsoft Word 2007 with data from Microsoft Excel 2007.
So let us go ahead and get started.
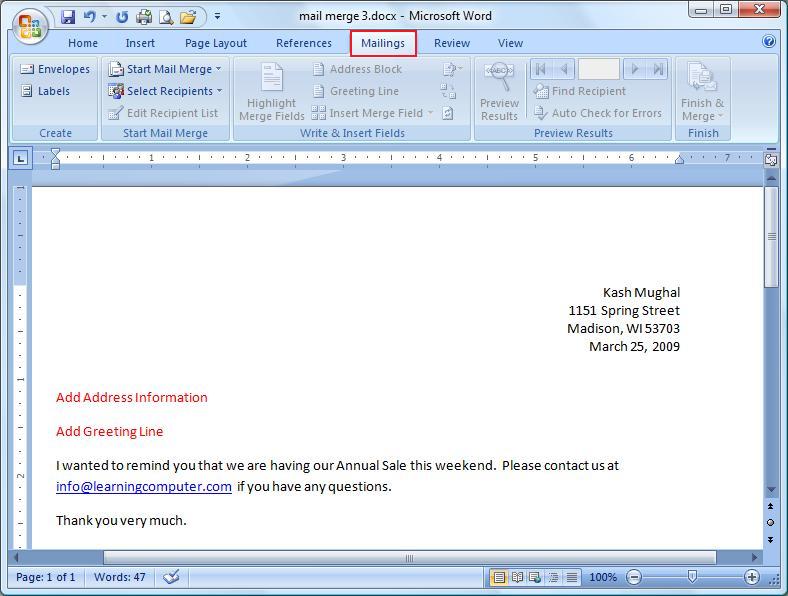
First of all browse to the Mailings
Tab which can be found next to the Review Tab. When you click on
it, you will see something similar to the screen shot
below. In my case I have written a generic form letter
that I will be sending to all of our customers. I've
added my address information, the annual sale
specifics and a few closing remarks. What I need to
do is add unique customer information and a greeting line to
the body of each letter.
|
|
Before I get started I also need
the customer data from Microsoft Excel 2007. Right below
is a screen shot of the data that I will be using for my mail
merge example. Let us take a look at some of the mail
merge fields; first name, last name, address
information, etc. Also notice that the data resides in Sheet 1
of the Excel workbook.
|

|
Switch back to Microsoft Word. Go
to the Start Mail Merge group under the Mailings Tab to
start the mail merge process. Select Start Mail
Merge command and then choose Step by Step Mail Merge Wizard.
I would highly recommend using this option if you are new to
mail merge. Here's what it looks like in my case.
|

|
This will launch the Mail Merge
wizard which is a six step process. In the first step,
you have to select what type of document will you be working
with. I'm going to use the Letters option and then click
Next. You can see the wizard on the right side of the
document as shown below in the red rectangle.
|

|
In the next step you have
to select which letter you will use for the mail merge. I'm
just going to use my current letter that I started with and
then click Next. There's a screen shot of what I'm
talking about shown below.
|

|
In step three I have to select a
data source for my customer list. For our demo, I am
going to use a list from Microsoft Excel as was mentioned
earlier. So I will choose Use an existing list and then
click on Browse.
|

|
This will launch a new dialog box
where I will find my customer data file in Documents folder. I
will click on Customer Data.xlsx and then hit Open. This is
shown in the figure below.
|

|
My customer data resides in Sheet
1$ so I will select that one and click OK. Also I will
check First row of data check box. The dialog box shown
below displays this information.
|

|
|
The mail merge
wizard will parse the data, and bring up a list of all the
possible mail merge recipients. In this list you can
choose the customers that you would like to send the letter
to. You can also sort and filter the data depending on
your situation. I'm going to be using the default
settings and just click OK.
|

|
When I did
this, it took me back to my previous screen with one exception
. Notice under the Use an existing list, you can see
that it found Sheet1$ in Customer Data.xlsx. I will
click on Next:Write your
letter to move to the next
step in the wizard.
|

|
In step four, I will be adding the
address information and also a Greeting line block to my
letter. Let us see how to do just that. In the
screen shot below, I have highlighted in red were the address
and greeting information needs to go. I'm going to
select my insertion point in my letter (blue arrow) and then
click on the Address block on the right side of my
document.
|

|
This will bring up the Insert
Address Block dialog box as shown below. In the Preview
pane, I see that the actual street address is missing, not
good. I need to fix this so I will click on Match fields
command button.
|

|
This will take me to the Match
fields dialog box where I can choose fields from the drop down
for the place holders. I will select Street for Address 1 and
then click OK. Here's a screen shot to display what I am
talking about.
|

|
Notice that this inserted street
address in the Preview pane. I can preview the information to
make sure it looks good. Then I will click on OK.
|

|
In the screen shot below you will
see that the wizard added an Address block in our document
shown in a red rectangle. Next we need to add a greeting
line, so I will choose Greeting line in the wizard on the
right side and rerun my steps. This is highlighted by red
rectangles in the figure below.
|

|
This will bring up the Greeting
line dialog box. For the format I just need to use the
first name, so I'll click on match feels again.
|

|
This will bring up the
Insert Greeting line dialog box as shown below. I
will go ahead and select the first name in the drop down and
then click OK. You get the idea on how to customize the field
selection and formatting within the mail merge wizard.
|

|
|
This time it
added the greeting line to my letter. We still need to
do one more thing before we can move onto the next step.
We need to remove the Add address information and Add greeting
line information that was part of the initial draft. So
please go ahead and remove them. These are shown using a
strikethrough below. Go ahead and click on Next
to move on to Preview Letters.
|

|
Yahoo! we can
actually see customer information and the greeting line in the
next screen shot. This is exactly what we needed to
achieve however font and showing up in red.
|

|
We must correct this before we can
move on to the next step. I can just use the mini
toolbar fix this problem. Here's what it looks like and
then I clicked on Next: Complete the merge.
|

|
At this point we are done
with our mail merge letter. You can either Print them
or you can Edit individual letter. I will click
on Edit individual letters to see what they look
like.
|

|
This fires yet another dialog
box with the heading on Merge to New Document. I
will choose All for Merge records and hit OK as shown below.
|

|
I think we are
all set at this point. If you look on the bottom left
corner, you will notice that it is displaying Page 1 of
the 100 letters that I need to send to my
customers.
|

|
If you
like this you can save this as a separate word document. This
is shown in this screen shot below. I'm going to call this
document customer mailings letters. Remember, you can always get back to
these letters and print them at a later time if you
like.
|
Google Ad
|
If you like you can Save this
as a separate Word Document. This is shown in this
screen shot below.
|

|
I'm going to call this document
Customer Mailings Letters. Having a saved document is
beneficial as you can always get back to these letters and
print them at a later time if you like.
|

|
At this point we are done with our
mail merge exercise. I did want to show you a few more
features in the Mailings Tab so let us take a look at some of
these quickly. Sometimes it is necessary to look at the
fields (place holders) that you are using for mail merge in
your document. You can highlight them by using Highlight
Merge Fields command under the Write
and Insert Fields Group. This is shown below
in the screen shot.
|

|
What if you
wanted to insert the last name in the greetings line?
You can easily do this by selecting the Insert Merge Field
command from the Write and Insert fields group. Here is
what it looks like in action.
|

|
If you wanted
to preview a certain customer, you can do this by using the
Preview Results group. Let us say that we wanted to look
at the tenth customer, we can easily use the navigation
buttons to browse to that customer. This is shown in the
figure below.
|

|
Boy we have covered a lot of
different things today, so let's recap quickly. We started with
a letter that you want to send to all of your customers.
However the list of customers is in Excel and we need to
use the information in letter; no problem. Using the
mail merge in Microsoft word 2007 we were able to do just
that. The wizard was helpful in locating the data source,
setting the merge fields, formatting the letter,
previewing the letters and then finally saving them as a
document.
This concludes the tutorial
on mail merge using Microsoft Word 2007.
|
|
This
concludes the lesson on Mailings Tab in Microsoft Word
2007.
If you are unable to find the information you are
looking for, please visit Microsoft's Word home
page
|
