| Connect with US! |
|
|
|

|
|
|
|
|
|
|
Access 2013 Tutorial
|
|
|
Find your Way Around Access 2013
|
Microsoft Access 2013 is more app-focused. The new database 'Access web app' allows users to create
and share apps without any difficulty. You can upload apps to SharePoint where others can Access
them as well. To make things easier, Access 2013 does not even require additional login information
apart from your SharePoint account. Moreover, apps created on Microsoft Access 2013 can even be run
on devices that do not have the program installed.
The focus of the new Access is to provide users with a faster and more flexible experience. The rest of
this Access 2013 tutorial will teach you how to find your way around the new Microsoft Access 2013.
Specifically, you will learn how to build basic apps, make databases, understand functions, and
create forms.
Our training partner is offering a special this month where you can
Download Free Office 2013 training
for a week!!
Here is what the interface of Microsoft Access looks like
in this new version of Office 2013.
|

|
Creating Apps in Microsoft Access 2013
You can create a Web-based database app on Access by using your SharePoint or Office 365 account.
Access also uses Microsoft SQL Server to enhance the performance of the apps.
You can even create desktop databases or use built-in templates to create the app.
To build an app, simply select a template or click "Custom web app", if you want to start from scratch.
Type in a name and location for the app, or choose one from the "Locations". Click "Info" in the "File"
tab to check the availability of the name and the server location. Click "Create" to proceed.
Here is how to create a new Web App in Microsoft Access Office 2013.
|

|
You will need to add table templates to your Microsoft Access 2013 app.
For instance, if you are working on "Task", search for the "Tasks" template and click it.
You will see a multi-tab icon if the template has related tables. If you want to start with a
blank one, click "Add a new blank table". The newly added tables will appear in the left pane.
In the next screen capture, we have highlighted Customers table from the Northind database in
MS Access 2013. The fields or columns are in vertical order where as the rows or records are
in horizontal order. The first field Customer ID is highlighted in yellow.
|

|
Next up you have the views, and Access 2013 automatically creates views for Datasheets and Lists
for each table. You may even come across a "Summary" view, where which items of a certain field are
collected together, although this depends on what kind of table template you are using in Access 2013.
To add a view, simply select the + sign. On the other hand, if you want to edit a table,
choose the table and the view and then select "Settings/Actions". Click on the action that you want
to be performed on the view. An advantage of using views in Access is that deleting them or their
controls does not remove the original data.
To work on the data in the tables, select "Open in Browser" in the "Home" tab. In the same manner
as before, choose the table and view, and then work on the data with different action buttons.
Data can also be imported into views in Microsoft Access 2013 from an external source
(More on this below).
Finally, you should click "Save" on the Quick Access Toolbar to save the app. If you need to move
or backup your app, you will have to save it as a SharePoint app package. To do so, go to the "File"
and select "Save As" followed by "Save as Package". You will also have to select whether you want to
keep data in the package or simply save the design.
|
How to Import External Data
Data from an Excel spreadsheet or a SharePoint list along with various formats can be easily imported
into the MS Access 2013 database. To import data into an app, go to the "Add Tables" section which can
easily be spotted when you are making a new custom app. Here you can import data from different sources
like SharePoint lists, text/CSV, spreadsheets, and ODBC data resources among other places.
Note that whenever you import data into an app, a new table will be created with default views.
When you are ready to Import an Excel 2013 spreadsheet in MS Access 2013, you are going to click on
Import > Excel Spreadsheet
We have included how this looks on our end.
|

|
If the app has already been launched, click "Select" followed by "Customize in Access" to open it
in Access. Next, click "Table" in the "Home" tab. On the "Add Tables" page, you will see some choices
at the bottom of the page for the type of the data source you want to import. Click on the option of
your choice and then follow the procedure in the "Get External Data" wizard.
Remember that you cannot include additional data to existing tables in an app when using the
"Import Wizard" in Microsoft Access 2013. Moving on, you may also have to import data from the
desktop database. Since databases in Access 2013 can import more types of files than apps, you can
always import data into the database before transferring it into the app. Moreover, unlike apps,
you can supplement data in the desktop databases.
Start the process by clicking the type of file you want to create in the "Import & Link" sections on
the "External Data" tab. As before, follow the procedure in the "Get External Data" wizard.
Access 2013 Databases
Databases in Access aid users in organizing all kinds of data, such as contacts or business processes.
To begin creating a database, you will first have to select a template. Templates in Access 2013 come
pre-loaded with items like forms, queries, and table. While template options will be presented right
away as you open Microsoft Access 2013, you can even find templates over the internet. To select a
template, select "New" in the "File" tab.
Choose a template for the desktop database and assign a name to it under "File Name". As far as the
location is concerned, you can simply go with the default location Access shows beneath the file name,
or select the folder icon to choose one yourself. Once this is done, click "Create". If a "Login"
dialog box comes on the screen with options to create a users' list, select "New User" and enter details in the "User Details" form. After clicking "Save & Close", enter your user name from the list and click "Login".
On the other hand, if you see a "Security Warning" note in the Access 2013 message bar (in case you used
an online template), select "Enable Content". However, only "Enable Content" if you are sure about the
source of the template. In addition, you may have to login once again.
|

|
Creating Databases without Using Templates
If you do not want or find a template suitable to work with, you can start with a blank desktop database in Microsoft
Access 2013 as well. To select a blank database, click "New" followed by "Blank desktop database". Enter the name of the
database in the "File Name" section. After selecting the location, click "Create".
In any Access 2013 database, you will need tables to store your data. When you first open a blank database, you will come
across a plain table in the Datasheet view when information can be entered. To bring in additional tables, click "Table"
in the "Create" tab. Along with entering information in the blank field, you can even paste data from other sources.
Note that copy pasting is preferable if the data is divided into columns. If the program has no columns, such as Word,
you can convert text into table format or even use tags to divide the data. Also remember that all editing should be done
in the original before you copy and paste. Next, use the combination Ctrl+C to copy the data from the source and then open
the Access table where the data has to be added in the Datasheet view. Use the combination Ctrl+Vto paste it.
Rename the column and save it.
If you want to change the name of a column, you can do so by double-clicking its heading and then enter the changed title.
For the ease of future reference, choose a name that describes the contents accurately so that you don't have to open
every column in MS Access 2013 to see what it contains. Further columns can be added by typing in the "Click to Add"
section. Columns can be easily moved. All you have to do is click on the column heading and then drag to any location
you want. Adjacent columns can also be dragged to other locations in the same manner.
|

|
Creating a Form that Comes into View at Startup
To start off, it is possible to create an unbound form that will come into view when you launch the Microsoft Access 2013.
Here is how you can create a form.
Go to the "Create" tab on the Ribbon and in the "Forms" section, click "Form Design".
You will now see a form in Design View. You have to save this form either by using the combination Ctrl+S or
bysimply selecting "Save" in the Quick Access toolbar. You will also have to designate a name for the name when you
save it.
Once this is done, you will move on to create the AutoExec macro that opens the form when you open the
Access 2013 database. When you create a new macro, a blank macro will appear on the screen, and you have
to add an OpenForm action to it. When prompted to type the Form Name argument, use the same name that
you set for the form created previously. To do so, simply click the Form Name argument, click its down
arrow and select the form you created from the drop-down menu that comes into view.
Click "Yes" to save the macro. Note that you have to name it AutoExec since this name will prompt it
to open the form automatically. Once again go to the "Create" tab of the Ribbon and click "Macro"
in the "Macros & Codes" section. This second macro will be created to store the submacros for your
buttons in MS Access 2013. Save this macro and to avoid any confusion, give it a different name than
your form. Finally, start adding buttons by clicking the tab for the form to complete the process.
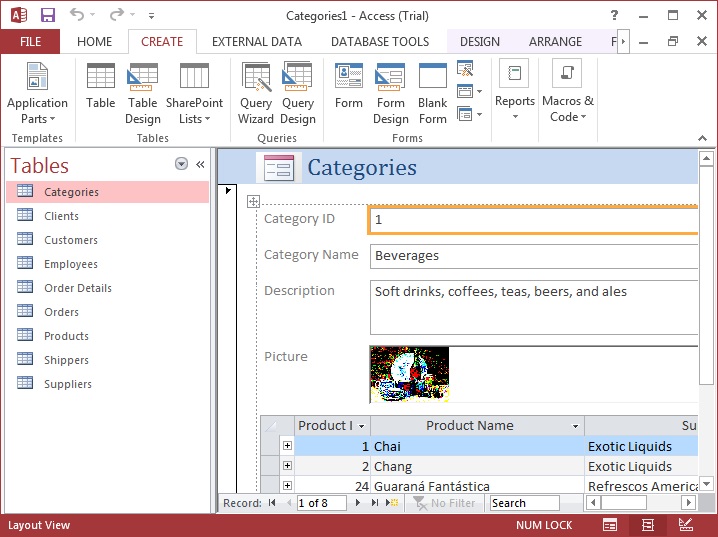
If you want to quickly create a Data entry form in MS Access 2013, you can do the following:
Select table and then do Create > Form
|
|
|
Learning Microsoft Access 2013 Functions
You cannot understand the functions of Microsoft Access 2013 just by looking at their names, but the
"Help" section can provide some guidance. To open the "Help" window, go to the "Expression Builder"
and in its left corner you will find the "Functions" folder with a + sign next to it. When you click
the sign, the list will expand. Next, go to the first column of the "Expression Builder" and select
"Built-In Functions" and you will see the category names being displayed in the column on the center.
To see functions within a category listed in the 3rd column, click the name of the category in the
middle column. Alternatively you can click in the middle column to view all the functions in
the 3rd column. Click the name of the function for which you want some additional details about. You
will find the "Help" option in the top-right edge of the "Expression Builder".
If there is no help for a particular function, simply type its name in the Access Help search box.
Note that functions will be categorized by their type, so if you know the purpose of a function, type
it in to make your search easier.
Somewhat of an advanced topic, but remember that Database Tools in Access 2013 give you quite a few
options including Database Relationships and Compact/Repair tools. Here is a computer GUI of this shown
right below.
|

|
Office Access 2013 Shortcuts
Finally, here are some keyboard shortcuts for Access 2013. Microsoft Access is already a user-friendly
program and these shortcuts will help to make the experience smoother.
- To display or hide the Ribbon, use the combination Ctrl+F1
- To check spelling in a highlighted object, press F7
- To display or hide the Navigation panel, press F11
- To display properties of a selected object in the Design View, use the combination Alt+Enter
- To start a new Access 2013 database, use the combination Ctrl+N
- To print an object, use the combination Ctrl+P
- To move focus to another area of the screen, press F6
- To delete a selected object, press Del
- To delete a selected object but save it in clipart, use the combination Ctrl+X
- To enter date, use the combination Ctrl+;
- To copy the entry from the same field in the previous record, use the combination Ctrl+’’
- To Access the record with the record number, press F5
Conclusion
Access 2013 improves on the 2010 version in many ways. In fact, since both the front and back end
have been revamped, Access 2013 has come out as a new product in the truest sense of the word.
|
Useful links for Office and Access 2013
Training:
Of course, there are many other features in Access
2013. The best thing to do in this
case is to take a look at some important online
resources for finding out details on all that Access
2010 has to offer.
For those who require extra information about Access 2013
the following links may be a good ones to visit.
-
How to create your first database in Access 2013
-Try Access 2013 Training for 7-day FREE trial!
-
FREE Access 2010 Training from GCF
-
MS Access 2013 Tutorial
-
Integration of SQL Server and Microsoft Access 2013
|
|
|
| |
|
|


