|
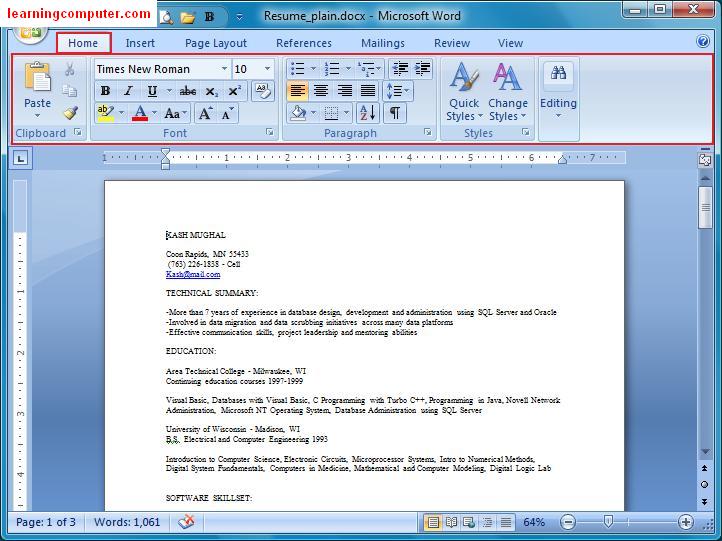
The Home Tab is by far the most important Tab in
Microsoft Word 2007. The Home Tab contains all the commands
that are used most often. These include formatting
commands like changing text size, font style, font color, list
types, and clipboard functionality like Cut, Copy and Paste.
Furthermore, the home tab in Word 2007 includes features
like text alignment, line spacing, gallery styles and theme
settings. Finally, the Home Tab includes the ability to
find and replace text.
For this lesson I will be using
my resume for practice. Here is a print screen of the Home Tab
in Microsoft Word 2007.
|
|
The groups on the Home Tab are as follows:
- Clipboard
- Font
- Paragraph
- Styles
- Editing
Let us take a look at these groups
one at a time. The first one is the Clipboard.
This group includes popular commands like Cut, Copy and
Paste. Using the Cut command, you can remove a
piece of text from one location and insert it into a new
location within the same document. You can
also use the Copy command instead of the Cut command, however
this will leave the original text in place. Next you can
browse to the new location where you would like to insert the
cut text. Using the Paste command you can then insert
the text at this new spot.
For our example, I am going
to move the section on Education all the way down in my
resume. You can first select the text using the keyboard or
mouse. Next you can click on Cut button to add this to the
clipboard.
Here is a screen shot of what I am talking
about.
|

|
Next I scroll all the way down in my resume. I find a
new line and click on the mouse to enable the insertion
point. Then, I click on the Paste command under the
Clipboard group to insert the section on my
Education.
Here is a screen capture of this
action:
|

|
You will notice that the Education text block has now
been inserted into the new area which happens to be on a new
page. You can see that we are currently on the second page
whereas we were on page one before we did the Cut and Paste
operation.
|

|
When you need to modify a part of
the text in your Microsoft Word document, you can use the
Font group under Home Tab. You can choose from options like
font size, font type, bold, italicize, underline etc. In
addition you can highlight a portion of your document and
experiment with different font colors under the Font
group in Microsoft Word 2007. Here is a display of the
formatting options relating to Font.
Let's say we would
like to change TECHNICAL SUMMARY heading in my resume to bold.
You can highlight the specific text and then click on the Bold
command as shown in the red square below.
|

|
Here is the end result in Bold instead of Normal font
setting shown previously.
|

|
Notice that the font group also has a dialog box
launcher on the bottom-right corner in the Ribbon screen shot
below. This gives you even more options related to font
and character spacing. These may look familiar to you as they
were available in Microsoft Word 2003 and earlier versions.
The next few figures display these
options.
|

|
|
|
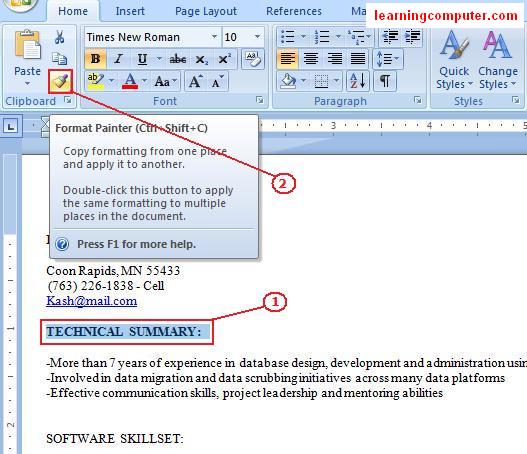
I'm going to switch back to the Format Painter option
that I skipped over from the clipboard group. This is a
handy little feature that will let you copy formatting
from one place to another using the mouse. This is what
you need to do. First you need to select your text,
apply the necessary formatting and then double click on the
format painter command. Now you can highlight any
text in your document that needs to have the same
formatting. Sweet! In the case of my
resume, I want to copy formatting from Technical Summary to
all the Headings like Software Skillset, Professional
Experience, etc.
Here is a screen shot of
the needed steps in order.
|
|
As long as the Format Painter option is enabled, you
can simply copy that formatting anywhere in the document. I
just applied the formatting from Technical Summary to
Software Skillset as shown below.
|

|
I also feel that I need to emphasize the Technical
Summary portion of my document. I'm going to highlight
the specific area and then change the font style to something
more eye catching. After I select my text, I can click
on font style drop down, and try one of the many
available fonts from the list. You will notice as you
hover over these font styles, Microsoft word 2007 will give
you a live preview of what the text will look like after the
selection has been made. I really like the Live
Preview feature in Microsoft word 2007, very cool. I
think I like the Franklin Gothic Demit font style, so I will
choose that one.
This is shown as
follows.
|

|
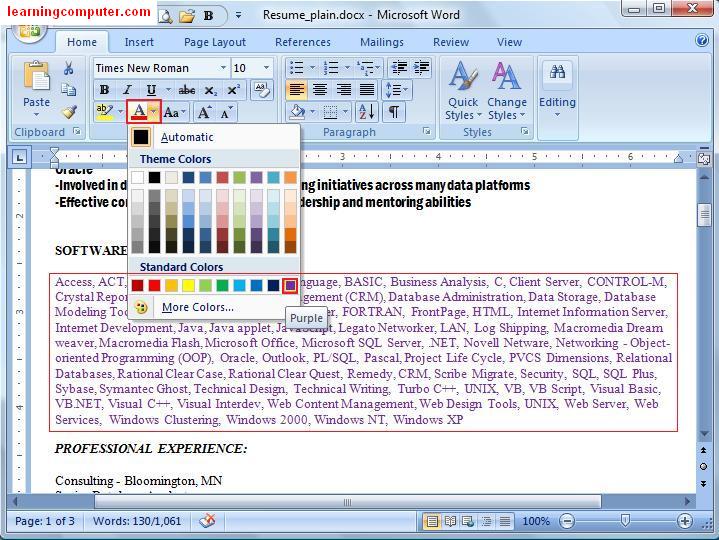
The Headings look good in my resume, however my actual
software skills look rather blah. How about a little
font color change to spice things up? I can do just that
by using the color palette options under the font
group. Purple looks good so I will select this
choice for my skills section. My resume looks acceptable
now so I will go ahead and save this
document.
|
|
Sometimes you may have made a lot of changes, maybe
more than you wanted to, I do that sometimes. At that
juncture you may wish to clear all the formatting from your
document. You are in luck as Microsoft Word 2007 has
just this option for you. It is the Clear Formatting
command under the Font group. The keyboard shortcut for
this is Ctrl + Spacebar.
Here is what it looks like
and the screen capture below.
|

|
After I used this option, I was able to get back to my
original plain resume. It's good to remember the Clear
Formatting option when you need to get back to the way things
were originally.
|

|
Moving on to the Paragraph Group, here you are able to
start a bulleted list, numbered list, multilevel list,
increase or decrease indentation, change the text alignment,
increase or decrease line spacing... Furthermore you can add
features like borders and shading.
Here is a screen
shot of this listed below.
|

|
|
The Paragraph Group in Microsoft Word 2007 has a lot
of different options just like the font group. Let us
jump right into it and start looking at these features one at
a time. After I switched my resume to the old
boring format, I am ready to redesign it again. I will
be using bullets to highlight the Technical Summary
section. In order to do this, I will select the section
and then click on Bullets command on the paragraph
group.
Here is an example using this
feature.
|

|
As I scroll down my resume, I would like to align all
the employers along the right margin. You can do this by
selecting the appropriate text and choosing the align text
right command.
I have a screen capture of this
right below in red rectangle. Notice that now the employer
info. has shifted to the right margin, perfect!
|

|
Within my job highlights, all the items are jumbled
up, that is definitely not good. I would like to
possibly use a numbered list to organize the highlights
of my prior job positions. Let's try this in
our next practice area. You can highlight the necessary
part in your document, click on the numbered drop down
menu of commands as shown below.
In my case I
used the one in the red square. After I selected this
option, it applied the formatting rather nicely to
my resume, shown in the long red rectangle.
|

|
As a final touch to my position highlights at the
consulting company in Bloomington Minnesota, I would like to
add some more line spacing here. Currently it is using a
single spacing which needs to be changed to 1.5 instead.
I will highlight the text, click on the line spacing command
and then choose 1.5.
This will apply the correct
line spacing as follows.
|

|
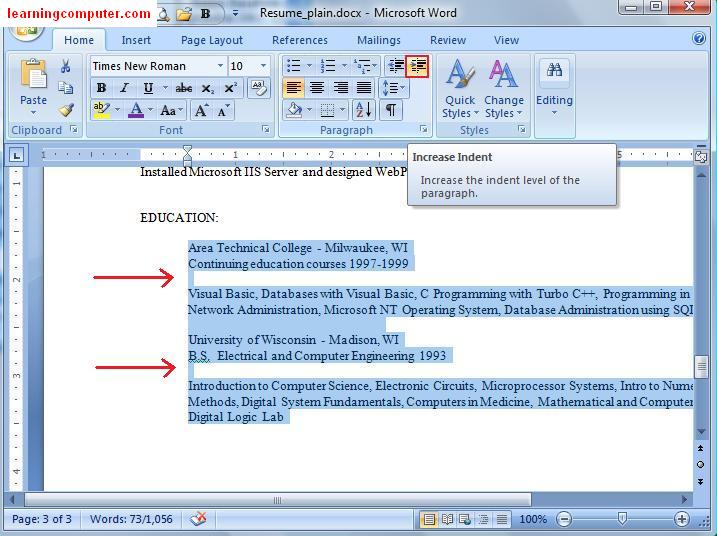
The last feature I want to look at in the paragraph
group is the ability to add indentation in a document. A
good candidate for this in my resume is the Education
section. I will highlight that entire area and then
click on increase indent command (red square). When I
did that, it moved the text to the right about half an
inch.
This is illustrated by the red arrows
shown below. Ok, I am done with this resume for now so I
will go ahead and save it.
|
|
The next group, Styles is going to make the biggest
impact in your document layout and design. Microsoft Word 2007
has done an excellent job of creating pre-defined quick text
styles that you can easily put to work.
A style
is a set of formatting settings, such as font type, size,
color, paragraph alignment, spacing and graphic settings.
When you use these ready made styles to format your document,
you can quickly and easily apply a set of formatting choices
consistently throughout your document.
Here is a
screen capture of the different styles with a preview of what
they look like on top.
|

|
Notice in the document above we are
using Normal style. Right next to it you will see
some other gallery styles, including Heading 5, Strong,
Subtitle etc. In order to work with the styles, you can simply
highlight the text and choose one of the many pre-defined
styles.
Let's practice with one of these styles
now. We are going to select my contact information in
the resume, and choose one of the styles. This is what
you need to do to make this
happen. First select the text that you would
like to change (step 1), then click on quick styles (step 2)
and finally choose one of the available styles. Using
these steps I was able to change my contact information to
Intense Quote, very nice indeed.
Here's what it
looks like on my computer screen.
|

|
Another excellent function of this group is
the Live Preview mode in Microsoft Word 2007. When you
highlight certain text and choose a quick style,
Microsoft will apply a temporary formatting to it that will
let you review the style before you decide to accept, sort of
like "Test drive before you buy". You can even change the
style in your document to a global level by choosing
Style Set command under the styles group.
Here is a
screen shot of this with the necessary steps in order of
action.
|

|
Using the same Quick Styles I'm going to apply the
Heading 2 to Software Skillset and Professional
Experience also.
These are visible by the red
rectangle in the screen capture below.
|

|
My resume is looking quite good now as opposed to the
plain one that I started with. However I still need
to add a little more pizazz to this
document. What can we do to achieve
this? How about using one of the ready made style sets
available from the styles group? When you select one of
these style sets, you will notice that not only do
the styles on the ribbon change but all styles
in your document are updated as well.
Before
using the style sets you need to define elements like
headings, titles, quotes, and subtitles in your
document. We already did that in the previous step so we
are good to go. For my resume I will click on
change styles, choose style set, and then
select "Word 2007" style. Wow! Notice the dramatic change
in my document as captured by the screen shot
below!
|

|
I think I have finally found what I was looking for.
My resume looks awesome with selected color
scheme, font choices and smooth graphical
formatting. Let us go ahead and save this document
now.
Here is a preview of the final product, just a
little improvement over the original one, don't you
think?
|

|
The final option I wanted to talk about is the Editing
group. This will help us in finding text,
replacing text and selecting document elements.
Let's say you wanted to find a certain text or expression in
your document, no problem. I can use the Find command to
do just that. You can even change the text easily by
using the replace command. In my case I want to replace
the word DBA to database administrator in my resume.
I need to select the text first, click on Editing
option and then choose Replace. This is shown below in
the screen shot.
|

|
This will invoke the Find and Replace dialog box as
shown below. The original word is in Find what textbox,
the new word is in the Replace with textbox. As I
click Replace, it will switch DBA to database
administrator.
I have highlighted the first word
that it found as shown below. This looks good so let's
go ahead and click on Replace All command
button.
|

|
Looks like there were two other instances of this word
in my resume so Microsoft Word 2007 was able to make the
change with a breeze.
This is visible in the
screen capture below. Click Yes and we are finished!
Yippee!
|

|


