

Microsoft OneNote 2019 Tutorial
Microsoft OneNote is a member of the Office family. It is a great productivity tool where you can write notes, draw sketches and store information in your computer, tablet or smartphone with a very simple and essential workspace similar to a digital copybook.
Starting from this 2019 release, OneNote does not require any Office subscription since it is installed as a free App on Windows 10 but remember that it does not work on older versions of Windows. In case you are on Mac, you can download this product for free directly from the Mac App Store.
Let us see how OneNote workspace looks like when you first open it.
OneNote 2019 Workspace
The main OneNote workspace is very simple and is divided into sections:
- Toolbar that holds all the features and tools available is on the top
- Navigation Panel is on the left side, with all the notes saved inside OneNote
- Big Preview Window is on the right hand side where you type, draw and link files

Three Levels To Get Organized
While working inside Microsoft OneNote 2019 you can organize yourself at three main levels.
- Notebook: It is the first level. A notebook is a big collection of chapters called Sections.
- Section: Next level down are sections. Inside a section you have all your pages.
- Pages: And finally there are pages with notes, drawings and attachments inside.
An Example: You create a notebook to hold all your recipes. Then you add different sections (you may call them chapters also) inside your notebook. Each section or chapter carries information about different types of dishes. You create a section for appetizers, one for main dishes, one for vegetarian dishes, one for desserts, and so on. Then within any given section or a chapter you add separate pages for the actual recipe. Suppose you have a recipe for a wild rice and mushroom burger. You have the ingredients, the directions, and then you can add pictures and even link to where you got the recipe from.
You can click on any Notebook or Section to open it and select any Page to show it on the main Preview. At first OneNote has a default Notebook with Pages showing several tips and suggestions explaining how to use the product. You can create new Notebooks, Sections or Pages by right-clicking on any empty space or using the plus buttons at the bottom.
Page Level Features
A new Page is completely blank, you can rename the Page and give a title. Then click anywhere on the Preview to fix the pointer and start typing.
Page Appearance: Open the ‘View’ tab to set the page appearance, such as its background color with Page Color and its layout with Rule or Grid Lines.
Editing and Formatting: When typing inside a Page a Text Note is created, collecting the whole paragraph within its grey contour. You can use the Home tab above to adjust the text properties such as font, size, style, color and alignment. These changes are applied on a single word, where your pointer is placed. You can click on the grey contour on top to select the whole text and edit it entirely.
Add File and Tables: Use File to browse and import image and PDF files as attachments inside your Page. These are added as simple notes with their name and icon within the grey contour. You can open these files by double-clicking on these.
Use Table to import a table with a defined number of rows and columns. Then click on any cell to type inside. These get adjusted according to the text content automatically, but you can set the cells size on your own by clicking and dragging their borders. In addition, you can use the Table section to adjust the table layout, adding or removing rows and columns and adjusting the color of the cells selected with Shading. Click on Hide Borders to hide or show the cell borders.
Page View: You can adjust the zoom level on the Page by holding down the CTRL or the CMD key and using your mouse wheel. You can also work in full screen mode by using the arrow button in the top right corner.
Use Tags: You can use tags to find what you need. Tags are a great way to categorize and group notes together that aren’t in the same notebook or section. You can either use the default tags or create your own tag system through custom tags. You just need to click the Create New Tag down here, and you can then name it and select an icon for it.
Optical Character Recognition
One great feature in MS OneNote is Optical Character Recognition, or OCR that has two great benefits.
- It lets you copy text from pictures so you don’t have to manually type it out. When you right click on an image with text, you get the option, ‘Copy Text from Picture’. You can copy the text and paste it either on the same or on a new page.
- Second, you can search for text inside an image. You have collected lot of information notes, web clippings and pictures. Later when you look for something specific, you use the search feature. With the OCR functionality, it will also search for the text in the picture, and will show you all the relevant information.
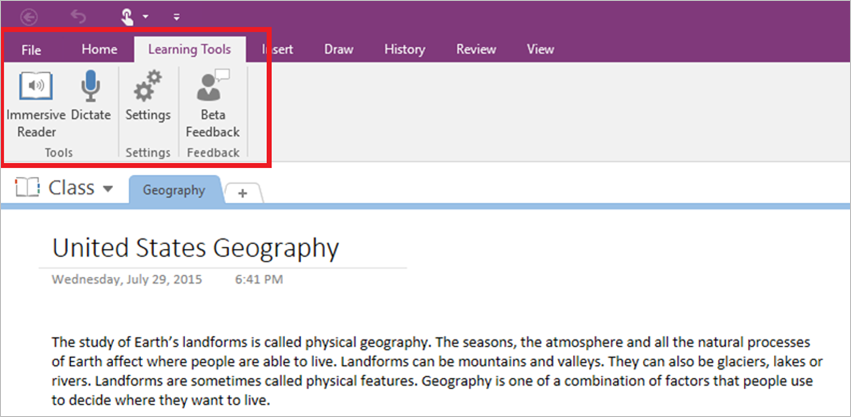
Immersive Reader
When you want to focus on a text, or for proofreading then the Immersive Reader feature comes to your help which apart from MS OneNote is now built into several applications like Word, Outlook. If you’re on a page, you can click on Immersive Reader from the View tab. It will show you the page without visual crowding, which makes it easier and faster to read. You can change the settings for text size and color themes to whatever fits your needs. Here you can also change the font as well.
There are many more features in Microsoft OneNote that can be very helpful depending on your needs. For example, you can hand draw shapes and then apply ink to shape, and OneNote will convert them automatically into shapes with straight lines and clean corners. One notes can also convert your handwriting into typed text.
Share OneNote Document
To export your OneNote document use the Share button in the top right corner, adding the email address directly or sending a copy via email or Skype. Whereas to print the current Page, Section or Notebook selected go to Print on the extreme right, setting orientation and page size.
Useful links for Microsoft Office Apps – 2019 Tutorials:
Microsoft Word Tutorial – 2019
Microsoft Excel Tutorial – 2019