
For most programs with animation (Microsoft PowerPoint, Adobe Animate, Adobe After Effects, etc.) the default movement when you animate an object or property is linear. In other words, the object suddenly starts moving a certain speed, keeps that same speed, and suddenly stops. It looks clunky, goofy and unrefined. Here we’ll show you how to quickly add animation easing to give your videos refined motions and transitions.
Easy-Ease Option
The quickest and easiest way to smooth out your animation is to use the ‘easy-ease’ option. For our example, I have a simple circle that I want to move across the screen and change its size. If you already know Adobe After Effects basics, skip the next section.
Setting the Stage
- Start by drawing a shape and add motion/scaling.
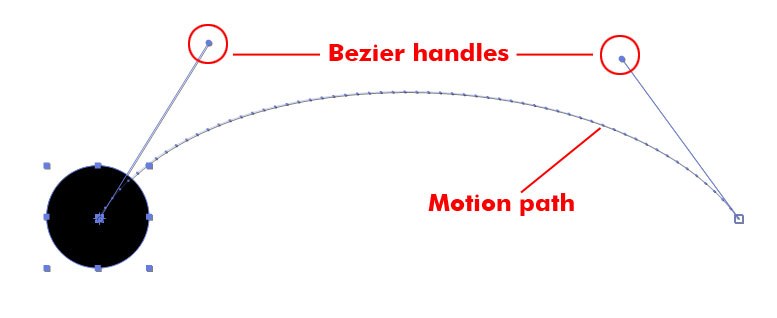
Adobe After Effects – A curved motion path without easing has evenly spaced position marks between start and end points.
- On the timeline and the slider set to zero second, click the ‘timer button’ for the ‘position’ and ‘scaling’ properties (‘Animate Property’ in the picture below). This adds a keyframe for both properties at time 0:00.00.
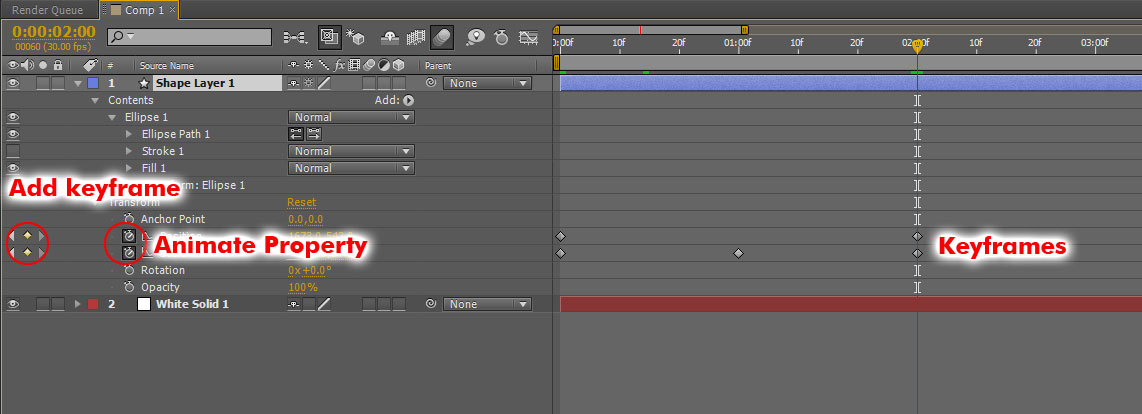
In Adobe After Effects, you add keyframes to properties using the animate buttons (clock) and keyframe buttons (diamond).
- In the timeline, move the time slider to 2-seconds (or however long you want the transition). You can animate the object by simply moving clicking and dragging it across the stage.
- To add animation to other properties, click the diamond (‘Add keyframe’) for that property in the timeline. Here we added animation to the scale as well. We added a keyframe for scale at 1-second, so it will go from 50% at 0:00, 100% at 0:01 and back to 50% at 0:02.
- We have also used the bezier handles on the stage to curve the path.
Change the easing
You will notice that the motion path has dots that are evenly spaced. When you play, the circle will go the same speed the whole time. Let’s change that.
- Select all of the keyframes and simply press ‘F9’ or you can right-click the keyframe and select ‘Keyframe Assistant > Easy Ease’.

In Adobe After Effects, you change keyframes to ‘ease’ by selecting the keyframes and pressing ‘F9’.
- The keyframes turn from diamonds into hourglass-looking shapes. On the stage, you will notice that the dots on the path are now dense at the ends. When you play, the object starts out slow, goes fast at the middle and slows down at the end.
You may have noticed a couple other options in the ‘Keyframe Assistant’ menu: ‘Easy Ease In’ and ‘Easy Ease Out’
- Easy Ease In (Shift + F9): Instead of the object going slow-fast-slow, this starts fast and slows down at the end.
- Easy Ease Out (Control + Shift + F9): This is opposite of Ease In. The object starts slow and finishes fast.
Graph Editor: More advanced motion
The ‘easy ease’ function in Adobe After Effects is quick and good enough for most projects. If you really want to tweak animation properties, the ‘graph editor’ will give you a lot more control.
- In the timeline, click on the ‘Graph Editor’ button towards the top.
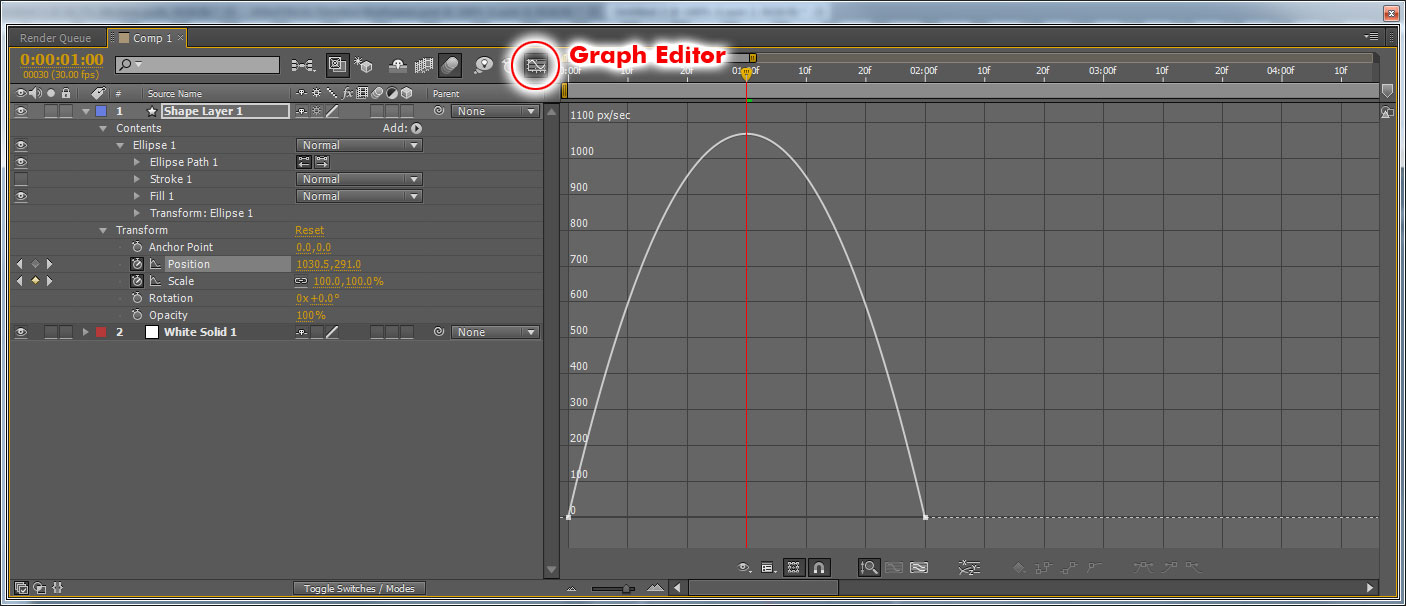
Timeline Graph Editor feature for Adobe After Effects
- The timeline will change to a graph. Here I have ‘Position’ selected only. The horizontal axis is still time and the vertical axis is speed (px/sec). The object moves from 0 px/sec to 1050 px/sec back to 0.
- To change the velocities, simply click and drag the anchors. Here we have made the object start out fast and gradually slow down.
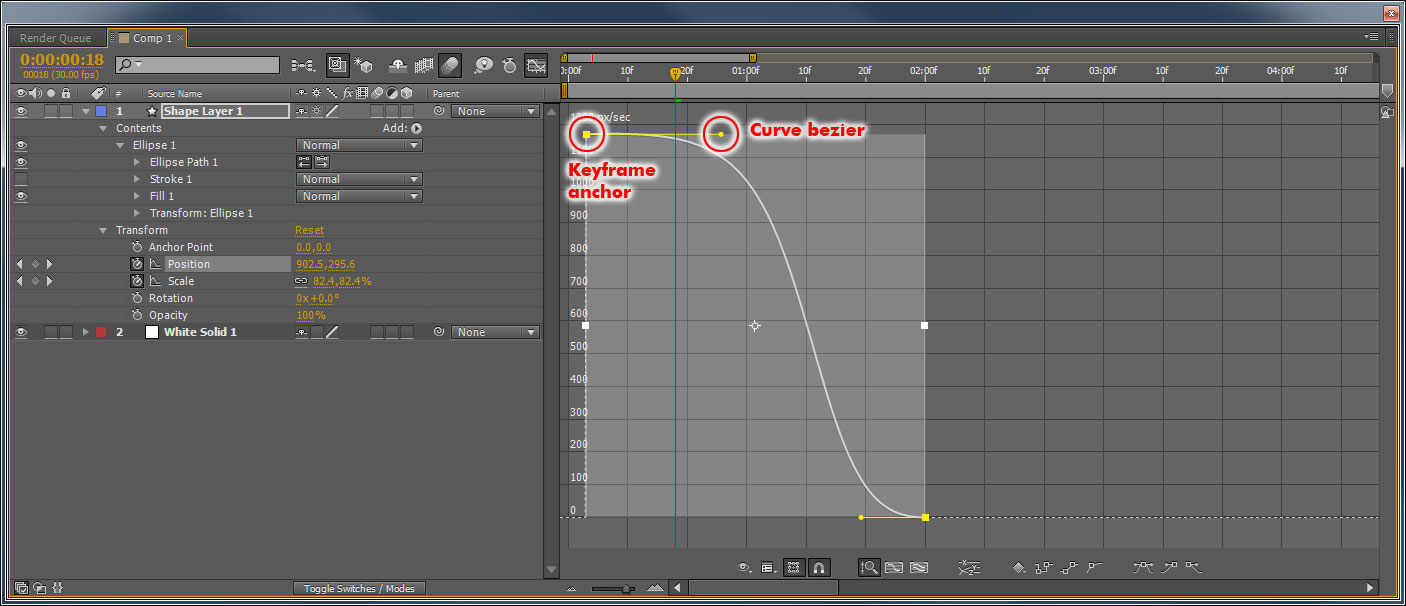
Changing acceleration attributes of an object using the Graph Editor feature for Adobe After Effects
- Moving the beziers will change the acceleration. Dragging away from the anchor will result in a slower change of velocity. Dragging towards the anchor will cause a more rapid change of velocity.
With the graph editor, multiple properties can be changed and viewed at once by simply shift + selecting that property. This should give you a basic idea of easing and time editing.
Further Reading
- Adobe After Effects – About spatial and temporal keyframe interpolation
- 4 Adobe After Effects Graph Editor Basics You Need To Know
- Setting, selecting, and deleting keyframes in Adobe After Effects
