
Adobe Photoshop has many cool image effects and filters that you can use for enhancing images or creating new logos and artwork that really stand out. A layer or clipping mask is one feature that allows you to cut out an image, much like clipping photos with scissors to glue onto a collage. A gradient mask is one step better as it adds transparency that you can fade. Let’s take a look at how to create a layer mask with a gradient and some things you can do with this feature.
Creating a layer mask in Adobe Photoshop
Let’s start with a logo and create some effects using our clipping masks. Here, we have a website logo and next to it is the ‘Layers’ panel for Adobe Photoshop.
- Select the layer to which you want to add a mask.
- From the menu, go to ‘Layer > Layer Mask > Reveal All’. They layer panel will now show two previews for the layer, the layer preview on the left and the mask preview on the right:

Adobe Photoshop – Applying a ‘reveal all’ mask to a layer.
Notice the mask preview has a dashed box around it. This means our mask is selected. Everything is white, which means all of our layer is visible. If you draw black on the mask, it disappears.
- With the mask still selected, select the gradient tool (G).
- We want to fade both sides of the logo, so let’s change our gradient to ‘Foreground to Transparent’ in the gradient menu. This lets us create a gradient on both sides. Remember that black means it’s transparent, so we will draw a black gradient on each end, leaving the middle white, or visible.

Adobe Photoshop – Selecting ‘Foreground to Transparent’ in the gradient tool’s options
- Start from one end of the logo and click and drag over a few letters. Holding ‘Shift’ while you drag ensures the gradient will be perfectly vertical and not at an odd angle. Here we have added a black background layer so the effect is more visible.

Adobe Photoshop – Applying a gradient mask to a layer.
So with a few steps, it’s pretty easy to make layers fade and blend. You can experiment with different gradient shapes. If you want a round-gradient, just select the ‘Radial Gradient’ option, next to the gradient type we selected above.
Gradient effects using a transparency mask
What we did above was create a gradient mask, fading our mask from black-to-white in order to fade-out our visible layer. What if we wanted to make a color gradient to an already cut-out layer? Looking at our logo, we have one word in blue and one word in green. Let’s make it fade from blue-to-green instead.
Just as before we are going to create a layer mask, but use a different option as we want to mask the text itself.
- Select the logo layer and go to ‘Layer > Layer Mask > From Transparency’. Note this only works for layers that already have transparency, or stuff cut out. If you do this to a solid layer or image, your mask will be the whole area.
Looking at a close-up of our Layers panel, notice that our layer now has a black background and our mask is now white text over a black background. Remember anything that is white on the mask is visible, so now we can change our layer and the text will still be visible.
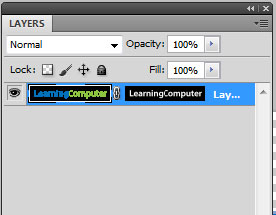
Adobe Photoshop – Layers panel showing transparency mask
- Select the layer in the layers panel (the left-side preview with the blue-and-green logo).
- Select your gradient tool (G) and let’s change our foreground and background colors to blue and green. Click on the foreground color selector and your mouse pointer will change to a dropper. Click on the blue part of the logo to grab that color. Do the same for the background and grab the green.
- Make sure the gradient tool is set to ‘Foreground to Background’ instead of transparency as we changed it in the earlier example.
- Now let’s create a gradient. Start from about the ‘n’ in ‘Learning’ and ‘Shift’ + click/drag over to the ‘p’ in ‘Computer.
Now we have a nifty logo that fades from blue to green.
Learning Computer Logo – with Gradient Applied
You can replace the layer with an image if you want to change it into a logo with scenery, again just like cutting out a photo into a shape. This should give you some ideas for that next Adobe Photoshop project. Have fun with it!


