
Microsoft PowerPoint is one of the most widely used application for presentations of all sorts at numerous levels, be it in school or office. With it’s growing popularity, the application too has grown in features over time. The newest features of PowerPoint 2010 being the ability to use your mouse as a laser pointer, while presenting and to be able to add videos on to your slides from the web in just a few clicks. Let us show you how!
- Having made a presentation put it on slideshow mode by clicking on ‘Slideshow From Beginning’ or ‘Slideshow’.
- When in that mode, hold down the ‘Control’ key (Ctrl) and the left mouse click.
- This will immediately cause a laser pointer to appear on the slide, and as the slideshow carries on you can conveniently move you mouse across the screen to point out certain facts etc. while presenting.

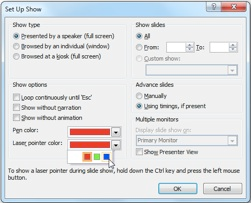
- You can also customise your laser point, by clicking on ‘Set up Slideshow’ under the ‘Setup’ tab. Following which you can change the colour and size of the laser pointer from the pop up window.

This is a unique feature, simplifying your presentations and inducing clarity to the maximum. To explore further possible actions with this feature, visit
To enhance your presentations aesthetically, it is now also possible to easily find and add videos from the web, removing restrictions in creative ways to present.
- Open a PowerPoint presentation and go to the slide on which you want to add a video.
- Click on the ‘Insert’ tab, followed by ‘Video’ and then ‘Video from Website’.
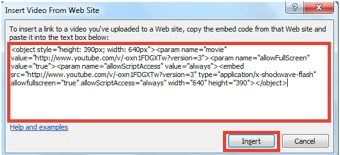
- This will open up a window in which you have to include the link of the video you wish to add.

- Simultaneously you must open the video on the internet that you want to embed and find the embedded code, make sure you do not just copy the link, doing so will show errors.
- Copy the embedded code and paste it on the pop up window on PowerPoint .

- After confirming the code, a toolbox will appear, with which you can edit the video, crop it, adjust it, place it, change the volume and brightness etc on the slide.
- Finally preview it before you play it back on your slideshow.
This feature is unique and gives you flexibility to be creative in your slideshow, however, you must remember that while showing the presentation, for the video to play you must be connected to the internet, or else it won’t play.
Aakshey Talwar
Technical Writer


